Wednesday, May 4, 2016

May Card Buffet


Please join me for my May Card Buffet....

Date:  Saturday, May 14th
Time:  9am-1pm
Location:  Peace United Methodist Church, Kaukauna - 2300 W. Wisconsin Avenue
Cost:  $18 or FREE with a $25 order

There will be an assortment of 16 card designs and you will choose which 8 cards you want to make!!

Send me an email by Wednesday, May 11th if you are able to attend so I know how many to cut for.

BRING A FRIEND AND YOU WILL BOTH RECEIVE A GIFT FROM ME!!!

Looking forward to stamping with you.
Cathy


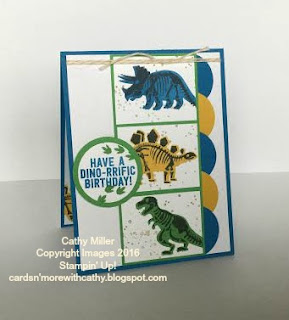
Fun Kids Card

I had a blast designing this great dinosaur card for our team meeting card swap.  It is always fun to stamp kids cards using fun bright colors.


 What child would not want to be the recipient of this cute card?  This stamp set is called No Bones About It and is my go to stamp for when I need to make kids cards, especially for boys.


Dimensions:
Pacific Point:  4-1/4" x 11", Scored at 5-1/2"
Whisper White:  5-1/4" x 4", 2-1/8" x 1-5/8" (3)
Cucumber Crush: 5-1/4" x 2-1/4"
Scraps:  Pacific Point, Crushed Curry, Cucumber Crush, Whisper White


Product List:

Stamps:  No Bones about it, Gorgeous Grunge
Ink:  Memento Black, Pacific Point, Crushed Curry, Cucumber Crush, Crumb Cake
Cardstock:  Pacific Point, Whisper White, Cucumber Crush, Crushed Curry
Other: Big Shot, Large Polka Dot Folder, 1-3/4", 1-3/8", 1-1/2" Circle Punches, Crushed Curry Bakers Twine - 24", Stampin Dimensionals

Instructions: 

  • Emboss white layer with Large Polka Dots embossing folder
  • Adhere 1-3/8" punched circles from Pacific Point and Crushed Curry scraps to the white embossed layer overlapping the circles
  • Stamp the splatter from Gorgeous Grunge set on the small white layers
  • Stamp the Dinosaur bones with black Memento ink and then stamp the corresponding solid image on top of each piece. Adhere the white layers to the Cucumber Crush piece and attach  to the embossed layer.
  • Stamp sentiment with Pacific Point ink on a white scrap and add the footprints in Cucumber Crush ink, and punch out with the 1-1/2" circle punch. Punch out a 1-3/4" circle with the Cucumber Crush scrap and adhere to white layer and attach to card base with Stampin Dimensionals.
  • Wrap the Crushed Curry Bakers Twin around the layers two times and knot. Adhere to card base.


Thanks for visiting my blog today...
Cathy


Graduation Time

It's that time of year when we start to receive High School and College Graduation invitations.  I received this card in a swap that I participated in and just love how simple it is to make.


Usually I make my graduation cards in the graduates school colors, but this one is so stunning that it just screams GRADUATION!!!  I definitely will be making more of these to have on hand.  This is just so stunning and the gold just adds that extra sparkle.


Dimensions:

Whisper White:  8-1/2" x 5-1/2"
Basic Black:  5-1/4" x 4"
Gold Foil:  4" x 3"
Vellum:  4" x 2-1/2"
Scraps:  Gold Glimmer, Basic Black

Product List:

Stamps:  Bravo, B.Y.O.P.
Ink:  Black Staz-On
Cardstock:  Whisper White, Basic Black, Gold Foil, Vellum, Gold Glimmer
Other:  Big Shot, Stars Embossing Folder, Heat Tool, 1" Square Punch, Silver Mini Brads, Pokey Tool/Mat, Small Star Punch, Gold Metallic Thread, Mini Glue Dots, Stampin Dimensionals


Instructions:

  • Fold Whisper White Cardstock in half for the card base.
  • Run Basic Black layer through the Big Shot with the Stars Embossing Folder and adhere to card base.
  • Stamp sentiment on Vellum with Black Staz-On ink and set aside to dry or heat set with Heat Tool.
  • Punch out three stars and attach to the vellum layer with Dimensionals.
  • Punch out a 1" square from the black scraps and poke a hole in the center and attach a Silver Mini Brad and secure in the back.
  • Loosely wrap the Gold Metallic Thread in the back of the cap and secure to the vellum layer with Dimensionals.
  • Attach Mini Glue Dots behind the stars and cap and adhere to Gold Foil layer, attach that layer to the front of the card base.


Thanks for stopping by today...
Cathy


Fancy Z Fold Card

I just love this cool fun fold card.  It is always fun making a card that has a different type of fold to it. This is the card I designed for a swap I participated in for the Stampin' Up! On Stage event in Salt Lake City.  Being involved in swaps is a great way to fill my card baskets for my customers to enjoy and want to duplicate.


Dimensions:

Tip Top Taupe - 4-1/4" x 11" scored at 2-3/4" & 5-1/2", 4" x 2-1/2"
Watermelon Wonder - 5-1/4" x 4", 3-1/2" x 3-1/2"
Very Vanilla - 5-1/8" x 3-7/8", 3" x 3"
Scraps: So Saffron

Product List:
Stamps:  Happy Happenings, Wild about Flowers
Ink:  Watermelon Wonder, Pear Pizzazz
Cardstock:  Tip Top Taupe, Watermelon Wonder, Very Vanilla, So Saffron
Other:  Big Shot, Fluttering Embossing Folder, Circles Framelits, Bitty Butterfly Punch, Watermelon Ribbon - 5", Linen Thread - 8", Blushing Bride/Watermelon Wonder/So Saffron markers, Basic Pearls, Mini Glue Dots, Dimensionals

Instructions:

- Run small Tip Top Taupe cs through Big Shot with the Fluttering Embossing Folder, wrap Watermelon Wonder ribbon around that layer and adhere to front of card
- Stamp the flower stem on the small vanilla layer with Pear Pizzazz ink
- Color the flowers with markers as shown
- Die cut the vanilla layer with the smaller circle framelit and the Watermelon Wonder layer with the larger circle framelit and adhere together, attach that layer to the front panel with Dimensionals
- Stamp sentiment on Vanilla layer in lower right corner with Watermelon Wonder ink, adhere vanilla layer to Watermelon layer and attach to the inside of the card base.
- Punch out two butterflies and add two pearls in the center and attach one on the flowers and the other on the inside layer.
- Tie a bow with the Linen Thread and attach to card front with a Mini Glue Dot.


Thanks for stopping by...
Cathy